best-practice
BEST PRACTICE | DNSBLs and email filtering - how to get it right
There are multiple benefits to using blocklists, reducing infrastructure costs, and workforce hours to increasing catch rates. However, to get the most from DNSBLs, it's vital to use them at the right points in your email filtering process.
In this Best Practice
- Introduction
- Efficient and effective filtering
- Stages to utilize DNSBLs
- Benefits of using DNSBLs before content filtering
- 1. Using DNS blocklists at the initial email connection
- What blocklists to use:
- 2. Using DNS blocklists during the pre-data phase
- What is the pre-data phase?
- Check the reverse DNS of the connecting IP
- Does the result of the rDNS check match the HELO string?
- Query the result of the rDNS against blocklists
- Query the domain contained in the HELO against blocklists
- Query the MAIL FROM (Return-path) domain
- The transfer of the email header and content
- Is the connection kept open at content inspection?
- A deeper dive into the benefits of using DNSBLs before content filtering
- Reducing the load placed on your resources
- Infrastructure protection against spam campaigns
- Senders can debug mail relay issues
- Emails aren’t left to linger in junk folders
- Innocent 3rd party infrastructures aren’t flooded with return messages
- Increased protection from hailstorm and snowshoe spam campaigns
- 3. Using DNS blocklists during the post-data phase
- Query the originating IP address:
- Query the Reply-to address:
- Query the Sender-address:
- Domains that are included in the email body
- Bitcoin addresses that are included in the email body
- Email attachments
- How to implement all of this?
Jump to
Introduction
Domain Name System Blocklists (DNSBLs) are a low-cost and effective way of stopping the torrent of inbound email traffic associated with spam and other malicious emails. There are multiple benefits to using blocklists, reducing infrastructure costs, and workforce hours to increasing catch rates. However, to get the most from DNSBLs, it’s vital to use them at the right points in your email filtering process.
Efficient and effective filtering
There’s a wide range of email security options for your infrastructure, from content filtering and scanning to network-based tools that use distributed and collaborative methods.
Unfortunately, the majority of the above are resource-heavy and expensive. The key to email filtering is to remove the bulk of unwanted emails right at the beginning of the process before they reach the resource-intensive content inspection stage.
A DNSBL check is the simplest, quickest, and most economical method you have at your disposal….so why not use it?
Stages to utilize DNSBLs
When you accept and process an email, there are three areas that you should use blocklists:
- At the initial connection – against the connecting IP.
- Throughout the pre-data phase of an email, i.e., the SMTP transaction
- Once the email data has been accepted i.e., during content inspection
Benefits of using DNSBLs before content filtering
Saves on bandwidth – you significantly reduce the number of messages that require downloading.
Saves on open connections – many connections are not needlessly held open.
Saves on storage activity – rejection before content filtering doesn’t use any storage resources (with the exception of a few logging lines).
General reduction in memory, storage, and CPU requirements – you have a far lower volume of emails that require expensive content scanning.
1. Using DNS blocklists at the initial email connection
At the very beginning of an email transaction, a remote server attempts to initiate a connection with your server. At this point, a quick lookup (query) to a blocklist can instantly (well, almost instantly) advise if the connecting IP address is associated with malicious behavior or not.
If the IP address is listed, you can choose to drop the connection immediately. Remember, this query is undertaken even before the Simple Mail Transfer Protocol (SMTP) handshake occurs.
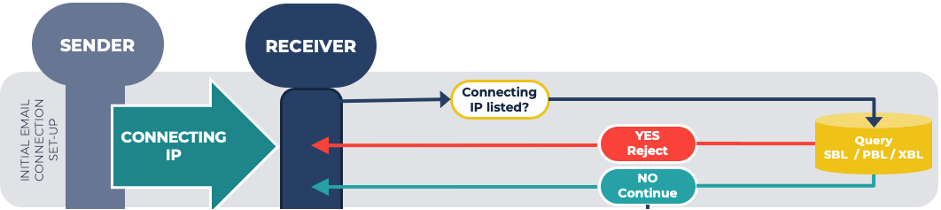
What blocklists to use:
- Spamhaus Blocklist (SBL)
- eXploits Blocklist (XBL)
- Policy Blocklist (PBL)
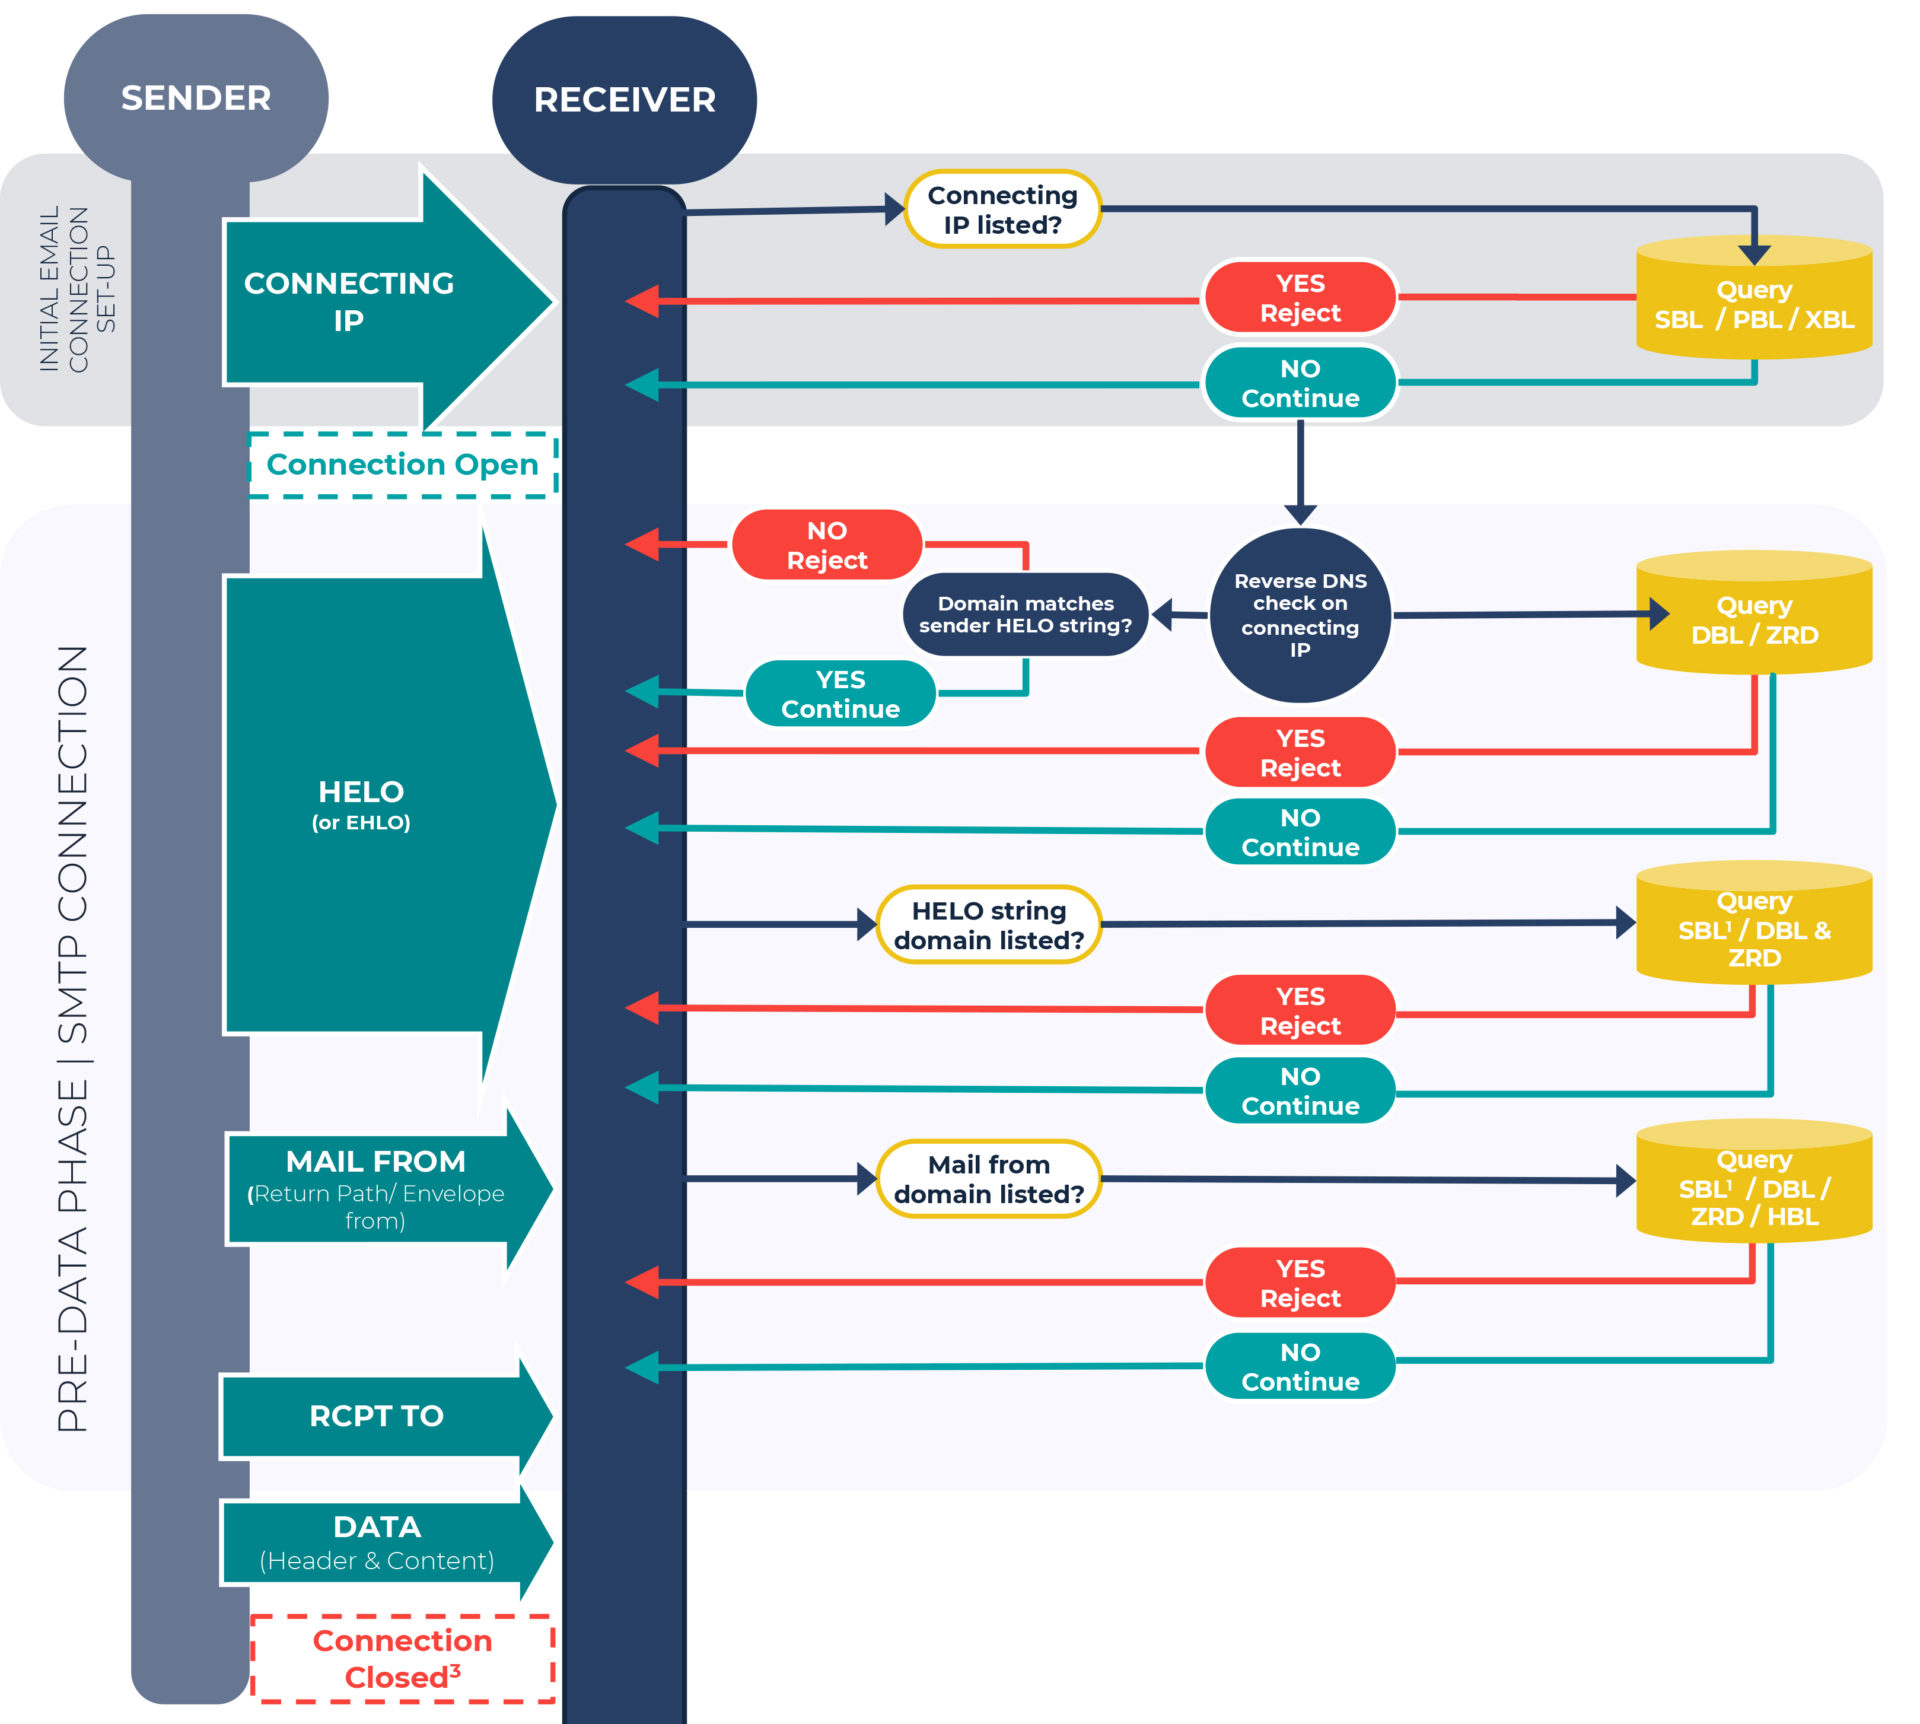
2. Using DNS blocklists during the pre-data phase
What is the pre-data phase?
For all email commands that occur after the initial email connection set-up (as detailed above) and before the DATA command during the SMTP connection, we term as the pre-data phase.
Check the reverse DNS of the connecting IP
Once the connection is open, you (the receiver) should do a reverse DNS lookup of the connecting IP address.
Does the result of the rDNS check match the HELO string?
The result of the above lookup should be queried against the domain contained in the HELO from the sender, e.g. (HELO mta-out.someisp.example). If they do not match, the connection should be dropped immediately. This is an indication that the sender isn’t who they say they are e.g. spoofing.
Query the result of the rDNS against blocklists
The domain returned should be queried against the DBL and the ZRD.
Query the domain contained in the HELO against blocklists
The domain contained in the HELO should be queried against the DBL and the ZRD, alongside running a forward DNS lookup against the SBL.
Query the MAIL FROM (Return-path) domain
Subsequent to the HELO, during the SMTP connection, is the MAIL FROM command. This is often referred to as the “Envelope-from” or the “Return-path.” You should query the domain included in this string, e.g., user@someisp.example
Whenever a query is made against the DBL and ZRD and a positive response is returned, receivers can reject the email or tag it for further inspection during the content filtering process.
The transfer of the email header and content
Once the RCPT TO command has been completed, the DATA command follows, and it is this that initiates the transfer of data, both the email header and content. After the receiver confirms this has been successfully executed, the sender transmits a QUIT command, either before or after content inspection, and the connection is closed.
Is the connection kept open at content inspection?
This comes down to both your implementation decisions and software choices. As with all options there are pros and cons for both:
Some implementations choose to keep the connection open, until they have the result of the content inspection.
Pros: Senders will always be notified of a rejection, which is the best strategy should false positives occur.
Cons: This is resource heavy and your MTA must be up to the task, even during peaks. Where resources are not sufficient delays may occur.
The majority of implementations close the connection before content inspection.
Pros: Lowers costs due to lower resource requirements.
Cons: Where false positives have occurred, the sender will not be notified.
A deeper dive into the benefits of using DNSBLs before content filtering
Reducing the load placed on your resources
As previously mentioned, content filtering and scanning are resource heavy. Reducing the number of emails that reach this point of the email filtering process saves on memory, reduces processing power and reduces latency.
Infrastructure protection against spam campaigns
Consider a situation where you receive hundreds of messages per second during a sustained or escalating spam campaign. If you are reliant on content filtering or scanning to mitigate the attack, your email infrastructure has the potential to collapse under the load put on it by the sheer volume of inbound emails.
If you’re lucky enough for this not to happen, you will still incur high costs, as every email needs to be downloaded and scanned.
Senders can debug mail relay issues
When an email is rejected at the initial connection or SMTP handshake, a Delivery Status Notification (DSN) is returned in real-time to the sender, advising them of the failed delivery. From a sender’s perspective, this can help with identifying and resolving mail relay problems.
Emails aren’t left to linger in junk folders
As a result of emails being rejected early on in the email transaction, potentially spammy emails aren’t downloaded and left, forgotten in a junk folder. This stops end-users from hunting through their junk folder to find one legitimate email out of hundreds, if not thousands of spam ones.
Innocent 3rd party infrastructures aren’t flooded with return messages
If the sender address is forged, the innocent third party whose email was used in the forged sender address will be flooded with return messages.
Increased protection from hailstorm and snowshoe spam campaigns
Using domain blocklists as well as IP blocklists provides you with extra protection against hailstorm and snowshoe spam, in addition to other threats. For a deeper understanding of this subject matter, we suggest you read MTA developers: allow use of domain DNSBLs at the SMTP level.
It’s worth remembering that our domain blocklist will contain many domains before they’re seen in the wild!
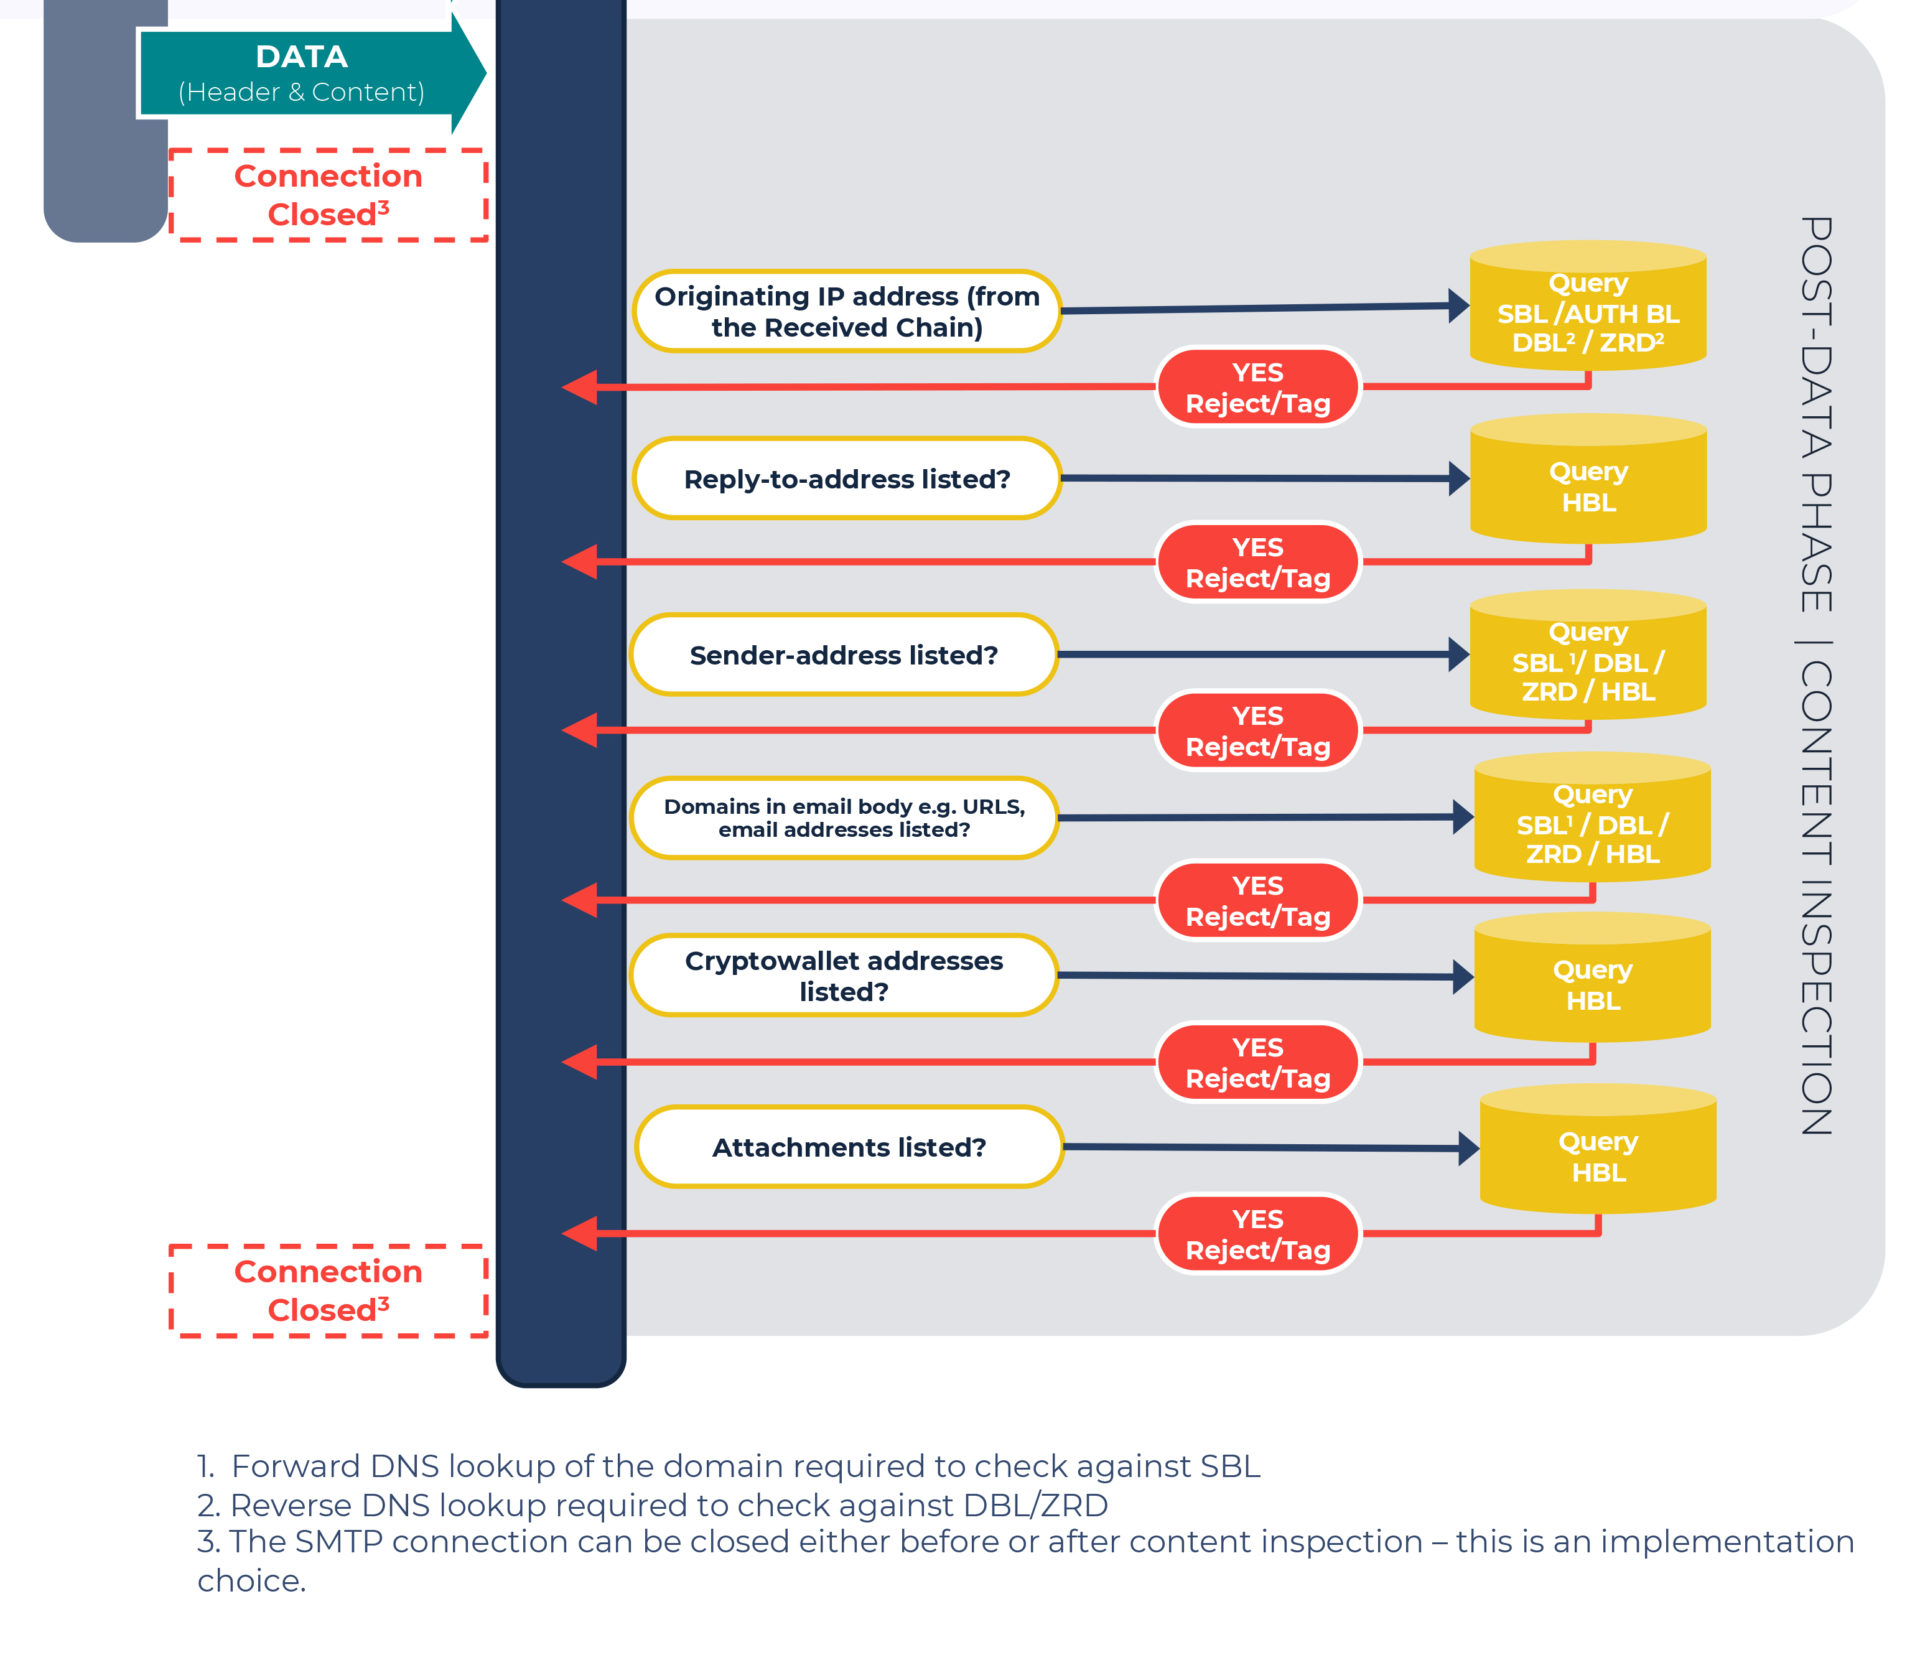
3. Using DNS blocklists during the post-data phase
Once the DATA command has run and the email header and content have transmitted to the receiver, content inspection commences, alongside running SPF, DKIM, and DMARC checks.
Email headers contain structured data making them far less resource-intensive to parse compared to that of the body of an email. To get a deeper understanding of an email header and body components, read Understanding the source code of a malicious email.
Here’s where blocklists can be used during the header inspection:
Query the originating IP address:
This is the IP address contained within the original transaction’s received chain, i.e., what initially generated the email. This lookup can be done against the SBL and AUTH BL. An rDNS lookup can also be done against the DBL & ZRD.
Query the Reply-to address:
The full email address in this field should be queried against the Hash Blocklist (HBL), which contains cryptographic hashes of email addresses.
Query the Sender-address:
Commonly referred to as the “Friendly From” address, it should be queried against the HBL, and the domain contained in it should be queried against the DBL & ZRD, with a forward DNS lookup against the SBL.
Finally, we’re onto the inspection of the content (scroll up to think of all the opportunities you have had to reject email before it reaches this more expensive part of the email filtering process!)
Domains that are included in the email body
Website URLs or emails in the body content should all be queried against the DBL, ZRD, with a forward DNS lookup against the SBL. Emails contained within the email body can also be queried against the HBL.
Bitcoin addresses that are included in the email body
Query these against the HBL, which has a cryptowallet section containing hashes of bitcoin and other cryptocurrency addresses.
Email attachments
All attachments should be queried against the HBL, which lists malware files, in addition to email addresses and cryptocurrency addresses.
How to implement all of this?
Sadly, with so many variances it’s not possible to cover all the specific operational details for different mail systems. Where some of our checks can’t be implemented, we recommend reaching out to the support desk of the product you are using.
The good news is that we do have two plugins for opensource filters, SpamAssassin and Rspamd, for both pre-data (SMTP) filtering and content analysis. Also here’s the full outline of what blocklists to apply where.
If you’d like to trial DNS Blocklists and run your own email server – then sign up to access the data free for 30 days. We’d love to hear how you get on.